
Decorating your door isn’t limited to painting or adding specific styles to the face of the door. In this guide, you’ll learn what an architrave is and how to fit one to ensure your door looks as neat and decorative as possible.
Table of contents
What is architrave?
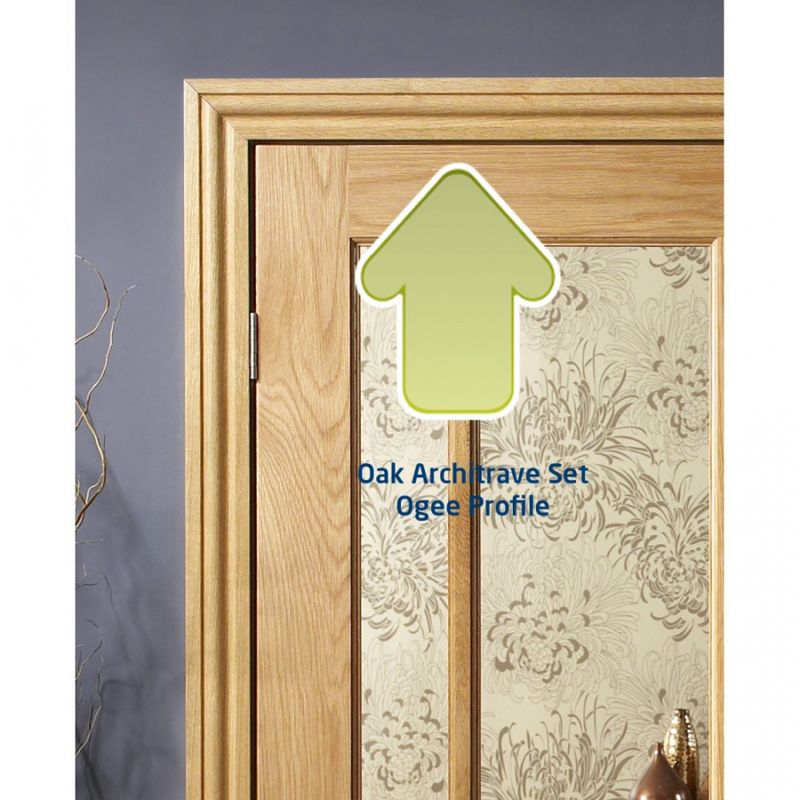
The architrave is what is used to decorate around a door, window or loft hatch. It comes in a wide variety of styles and materials to suit the needs of the installer and to compliment your internal doors. They’re great for hiding the leftover paintwork right on the edge of the door frame or even just as a standard decorative feature.
Architrave sizes & measuring up
Before you can move on to fitting your new architrave, you need to consider the architrave size in relation to that of your door.
There are four key architrave dimensions to take into account:
- Architrave width
- Architrave thickness or depth
- Architrave leg length
- Architrave head length
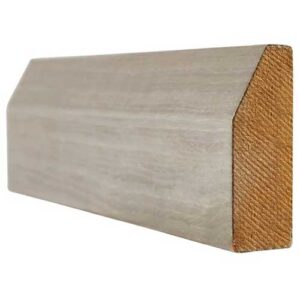
We should point out that there is one more dimension, namely the architrave profile height (how high the decorative shape is), but that doesn’t play a significant role in the installation process. So, we’re going to leave it out for now.
The head and leg lengths should be selected in relation to the height and width of the door, which is standardised to avoid any unnecessary issues.
That being said, it’s always a good idea to double-check with a tape measure once you’ve unpacked everything just in case there’s a minor discrepancy. If the architrave elements are slightly longer, you can use a plane to carefully remove the excess before sanding with fine sandpaper.
The architrave thickness – usually 15mm, 18mm or 25mm – should ideally match that of your skirting boards for both structural and decorative purposes. So, if you’re planning on installing both of these items as part of a new build or an extensive renovation, you’ll have to bear that in mind before you buy any.
Finally, there’s architrave width. The most common option in the UK is 70mm, but it’s far from the only one – 95mm or even 120mm are also readily available. Once again, the width of the architrave should match the height of the skirting boards. Your rule of thumb here is – the higher the skirting boards, the wider the architrave.
As always, you can make minor adjustments with a plane before you move on to fitting the architrave. However, we would advise you not to shave off more than a couple of millimetres so as not to damage the structural integrity of the product.
With the preliminary considerations safely out of the way, it’s time for your final preparations!
Preparation
Cable and pipe detection
You or perhaps plumbers and electricians may need access to certain cables or piping in the future. So checking for hidden pipes or cables can save you worry about having to remove the newly attached architrave in future. If you do find any and would rather get possible changes out the way first, contact professionals to discuss alternative solutions.
 Measuring
Use a tape measure and draw 6mm marks from the inner edge of the door casing. This needs to be done on both sides and across the top of the door casing. Then join these marks using a spirit level on a straight edge. You should have three lines. This will support architrave alignment.
Following this, measure the line you drew across the top. Mark its length onto the inner edge of the architrave, leaving enough room at either end for mitre cuts. For mitre cuts, you will need to lightly mark the direction you intend to cut onto the architrave.
Cutting the architrave
After measurements, place the architrave into the mitre box (flat side down). Use a tenon or fine tooth saw to make two 45-degree mitre cuts into the architrave. The mitre cuts are angled in opposite directions so the outer edge is wider than the inner edge when it comes on both sides of the door. From there you can sand the ends to make them smoother for a finer fit.

Fitting the architrave
Step 1: Apply adhesive
Using adhesive, apply it to the back of the architrave. Be sure to check manufacturer instructions as some adhesives may be stronger or weaker than others.
Step 2: The headpiece
This is the piece that will be placed above the door. Where your 6mm marking is, place the headpiece along that line and ensure the mitred corners are aligned with the marks on the sides of the frame. To support the headpiece as it sets, hammer four nails through the architrave and into the door casing.
Note: You can use nails instead of adhesive or vice versa. However, if you want a cleaner fit, obtain stronger adhesive or fill in nail holes once they have been removed.
Step 3: Cutting the side pieces
You will need to measure from the floor to the bottom of the headpiece. Mark this distance onto both sections of the architrave you plan to attach to the sides of the door frame.
As before, mark the intended direction of the mitre cut onto the side pieces – make sure you leave one side piece end cut square as this will be sitting on the floor. Make sure one outer edge of each side piece mitre is taller than the inner edge and sand to prepare for a smoother fitting.
Note: Test the mitre joint, and adjust if necessary, before securing it in place.
Step 4: Fitting the side pieces
Like the headpiece, you will need adhesive and nails. Fit each side piece one at a time. Apply PVA glue to one end of the headpiece and the mitre cut on the side piece. This is where the two shall meet and it can help support you when it comes to fixing the architrave in place.
Once all this has been done, your new architrave is complete!
Was this guide useful?
Mentioned in this project guide:


