Painted garden gates can do wonders for the appearance and improve the protection of the gate against the weather. Here’s how you can paint a wooden gate to get the most out of your fencing.
Table of contents:
- How to prepare a wooden gate for painting
- What paint to use on a wooden gate
- How to paint a wooden gate
- Final thoughts
How to prepare a wooden gate for painting
You will also need to consider the gate’s material and its condition. For example, rotting wood on old wooden gates will need to be replaced and peeling or cracking paint will need to be removed using a paint scraper or similar tool.
If your gate is in good quality condition, you can sand the gate to prep it for painting. Sanding the gate encourages the paint to stick better to the surface.
Note: If your gate was painted with oil-based paint before, sand and prime the gate before applying the new paint.
What paint to use on a wooden gate
First and foremost, avoid the use of old paint. This can risk the quality of the finish being below the desired standards. The most ideal type of wooden gate paint to use is a water-based paint.
It’s also beneficial to choose a better quality paintbrush. One that can be suited to the type of paint you use. A synthetic brush can be ideal for this as they are less likely to absorb water.

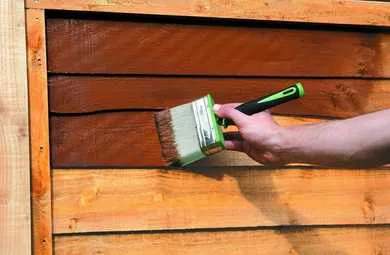
How to paint a wooden garden gate
Whether painting or priming, make sure coverage of all sides of the gate is done at the same time. This is because leaving the paint to dry on one side can risk warping or timber twisting because the tension of the surface is uneven.
Here are steps to painting a wooden gate:
Step 1:
Place down something to catch the paint drops underneath the gate. This can be an old cloth, piece of plastic or anything large enough and can typically catch paint droplets as you carry out the task.
Note: If you’re concerned about the hardware on the gate, then cover these appropriately with masking tape to avoid paint splashes.
Step 2:
Using sandpaper, smooth out any areas with significant damage and follow that with sanding down the whole gate. Make sure any dust or debris is cleaned away and, if the surface is dirty, washing the grime away with a garden hose is an option.
Step 3:
Next, you must prime the gate for painting with a brush and specific surface primer. If there are damaged areas, these can be lightly sanded, patched and primed again once the paint has dried.
Note: Holding the brush like a pencil can ensure proper brush control and prevent fatigue.
Step 4:
Once the primer has completely dried, you can now begin to apply paint. Start with a brush on the hinge and latch sides of the gate, following the grain of the wood. Then take the roller and apply the paint over the door as quickly as possible as the paint will dry. Once the gate has been covered, you can return to your paintbrush to smooth out any areas where there may be paint drips.
Note: Leave a minimum of 24 hours before applying a second coat.
When the paint is dry from the second coat, you can remove the masking tape. Your newly painted gate is complete!
Final Thoughts
Painted garden gates can really do wonders for the theme of your garden. Just make sure to cover key areas you don’t want to risk getting covered in paint and you’ll have a beautiful newly painted gate in no time. If you’re looking for more information, why not check out our complete garden gate buyer’s guide?
Was this guide useful?
Mentioned in this project guide:


